Theme Installation
Follow the steps below to upload the theme:
- Log in to your publication admin section at
yoursite.com/ghost/ - Go to Settings > Design (
yoursite.com/ghost/#/settings/design/) - Click Change theme and then click Upload theme and select the
crimson.zipfile. - After the upload is complete click Activate
Routes Setup
routes.yaml file.Follow the steps below to upload the routes.yaml file (The file is located inside the zip)
- Log in to your publication admin section at
yoursite.com/ghost/ - Go to Settings > Labs.
- Click on
Upload routes YAMLbutton and select the file from the root directory of the theme.

The routing file defines the following custom routes and collections:
/- the homepage (home.hbs)/authors/- custom template to show all authors/tags/- custom template to show all tags/latest/- custom template to show all posts/archive/- custom template to show post archive/contact/- custom template to show contact page with contact form
Code Injection
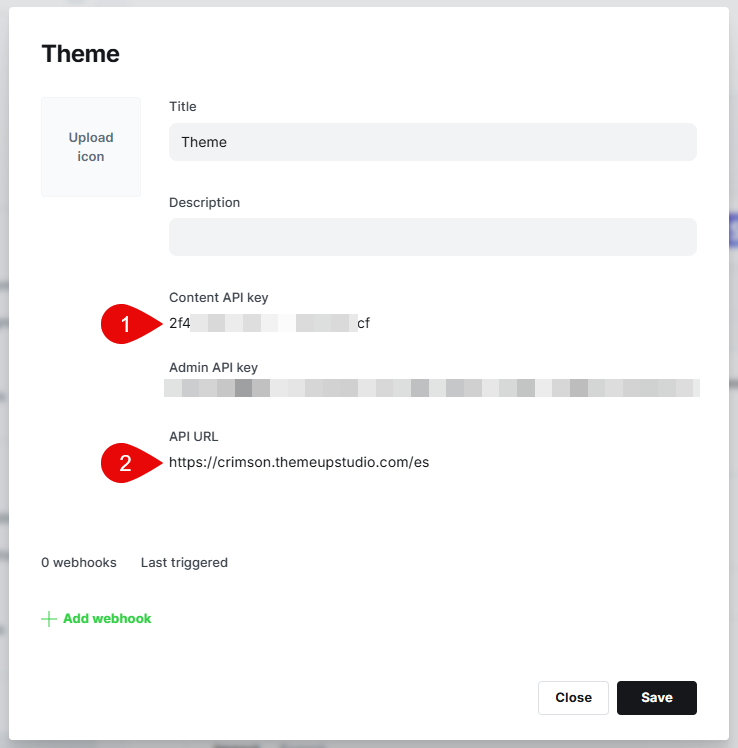
With Ghost 6.x, it has discontinued limit='all' , so we have paginated the Authors and Tags page. For that you need to create a custom integration and add the Content API key and Admin URL in code injection like:
<script>
  window.GHOST_CONTENT_API_KEY = 'abcdef123456798pqr987xyz';
  window.GHOST_API_URL = 'https://crimson.themeupstudio.com/es';
</script>
Code Injection JavaScript
You can create a custom integration by going to Settings > Integrations > Custom > Add custom integration.
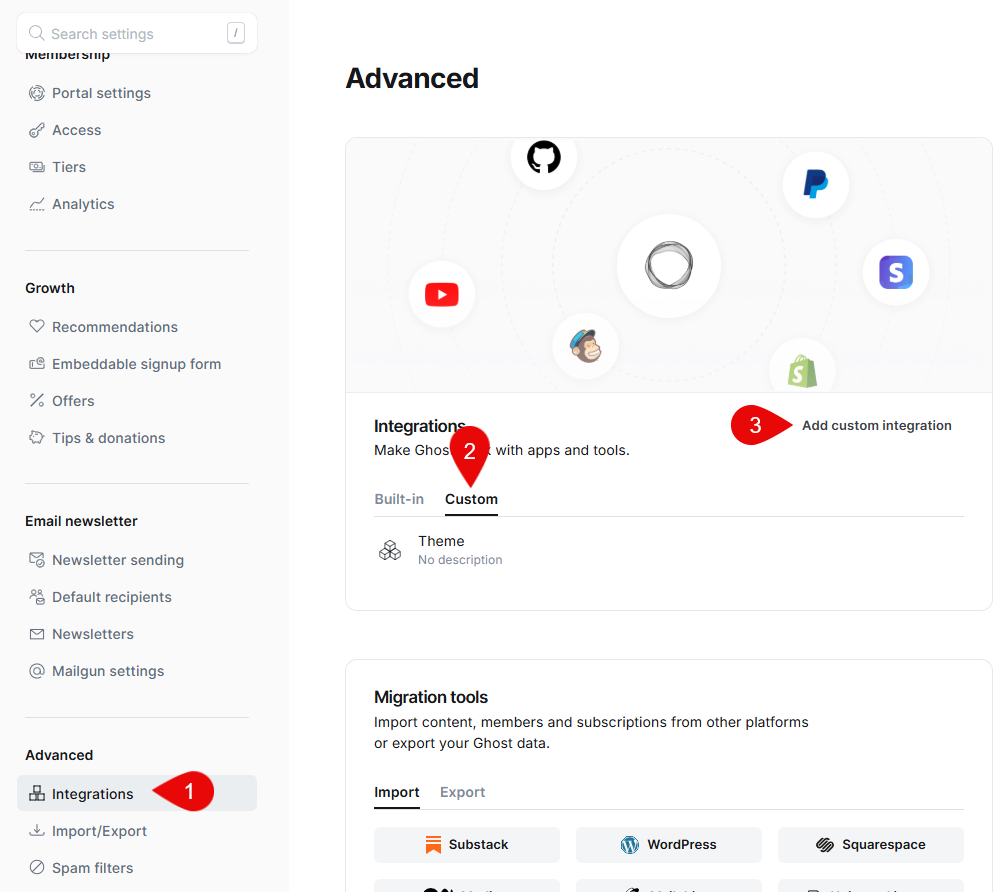
Copy the Content API key and Admin API URL and use them in the Code Injection JavaScript.
Custom Settings
The theme comes with custom design settings accessible from the Ghost Admin panel. To view and edit these settings, go to Settings > Design & Branding ( yoursite.com/ghost/#/settings/design/)
Brand settings
- Site Description: Add your site description which will be used as meta description in Google Search results.
- Accent Color: Select an accent colour. This will be used as the accent colour for Light mode.
- Publication Icon: Upload a square, transparent icon for your brand. This will be used as Favicon.
- Publication Logo: Upload a logo for your brand.
- Publication Cover: We are not using the cover image, so you can keep it blank.
Site-wide settings
- Default color scheme: Select the default colour scheme. Choose from
- Light: Light theme
- Dark: Dark theme
- System: System theme of the website visitor
- Logo for dark mode: Logo for dark mode. Ensure the dimensions are same as that of your default logo.
- Accent color for dark mode: Select an accent colour to be used in dark mode.
- Auto hide header: Automatically hide the header when you scroll down. It comes back when you scroll up. This is the default behaviour. But if disable, this setting, then the header will remain sticky and will not hide.
- Pagination style: Select from "Load More" button pagination or "Next and Previous" style pagination.
- Primary font: Choose from 7 Google fonts. Used for headings and titles.
- Secondary font: Choose from 9 Google fonts. Used for the rest of the body and paragraphs.
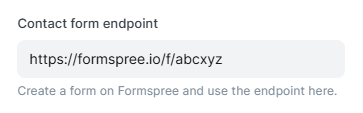
- Contact form endpoint: Add your Formspree form endpoint. E.g. https://formspree.io/f/abcxyz
Homepage settings
- Tag slugs to show on home: Comma separated tag slugs to be shown on the homepage sections. Ideally, select up to 7 slugs.
- Home tag section layout: Select the homepage tag section from a single row layout, two column layout with 2 each or in a 1|3 layout.
Dropdown Navigation
This theme supports dropdown navigation.
To add a dropdown navigation, follow these steps:
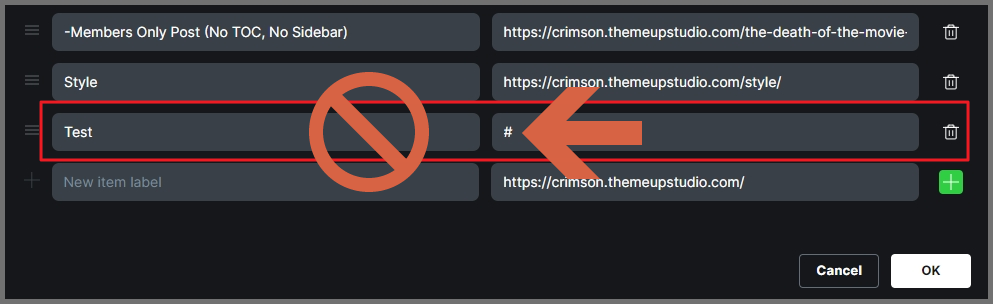
- Add a parent menu item that will link to '#'.
- Now add multiple menu items prefixed with '-'.
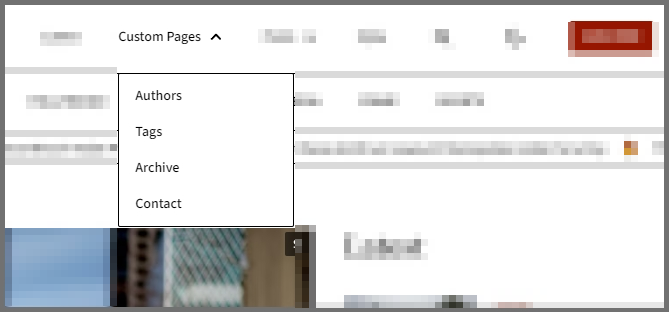
Consider the example below, where we created 'Custom Pages' as a dropdown navigation item with 4 sub menu items.
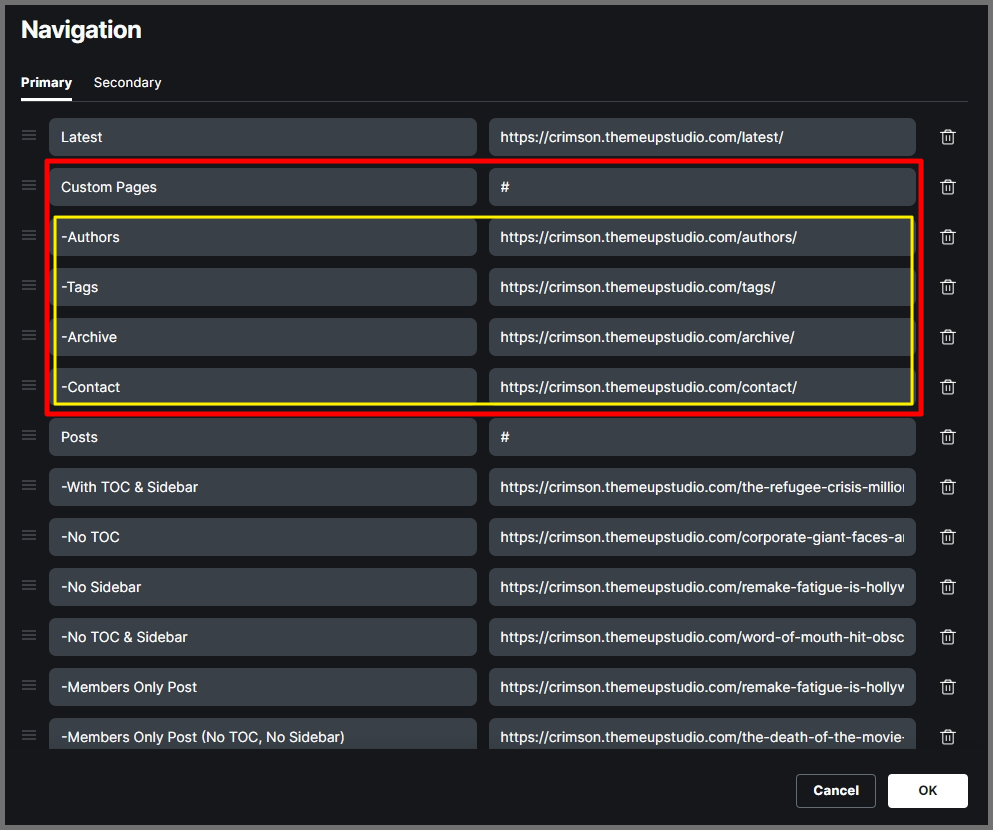
The resulting menu will render like the below:
Editor's Choice Section
To add a post to the Editor's Choice section, simply add the internal tag "#editors-choice" to the post. This section will display at most 4 posts.

Trending Ticker Section
To add a post to the top Trending Ticker section, simply add the internal tag #trending to the post. This section will display all the posts with that internal tag.

Contact Us Page
Crimson comes with a contact page with a contact form. To make the form work and receive form submissions to your email, you need to use a 3rd party service like Formspree.
Create a form on Formspree and add the endpoint in 'Contact form endpoint' setting.
Contact page also has social media icons.
To add/update social media icons, you need to make some code edits.
- Open
contact.hbsfile. - From line#51, you will see custom social media icons like YouTube, Instagram, etc. You need to make the following edits.
- You need to edit the
hrefattribute of the main anchor tag. - Edit the SVG icon for that social platform.
- Add the profile URL in the
div
- You need to edit the
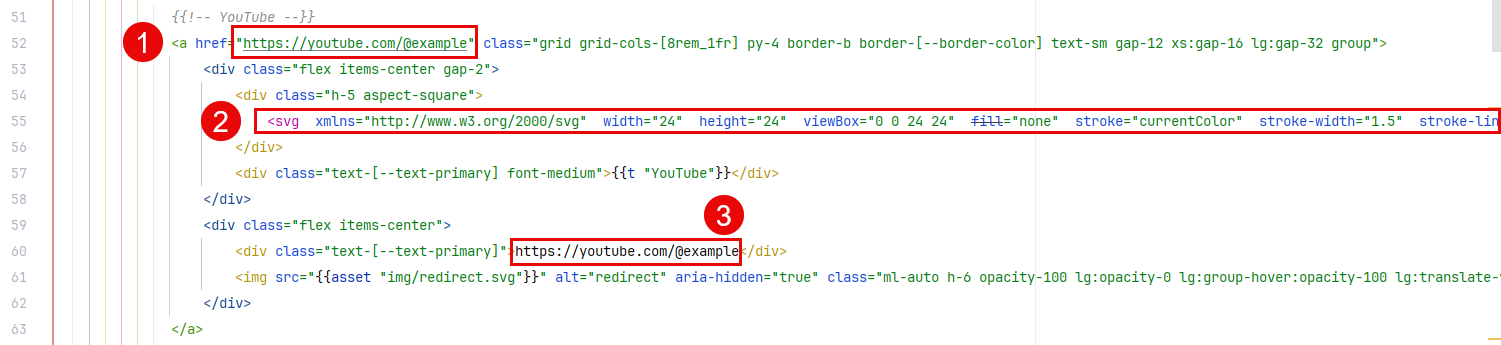
SVG icons are from tabler icons.
Stroke width used is 1.5. Once you copy the icon, you need to add h-full and filter-theme classes to the SVG.

Multilingual Ghost Publication
Crimson (version 1.0.2 and later) makes it easy to offer your Ghost site in more than one language.
- Built-in language options:
Right out of the box, Crimson includes English (the default), plus Hindi and Spanish. That means the theme already has space for content in those three languages. - No automatic translation:
Crimson does not translate your articles by itself. You will need to write (or have someone write) each post separately in Hindi, Spanish, or whichever languages you want. If you’d like an automated solution, you can connect a service like Weglot, which will translate your content for you—but keep in mind that automatic tools sometimes miss context or nuance. - How it works:
- For each language, create a version of your article written in that language. For example, write an English post, then write a separate Hindi post on the same topic.
- Publish each one as its own entry in Ghost. Crimson will know that, say,
/hi/my-blog-postis the Hindi version and/es/my-blog-postis the Spanish version.
- Let visitors switch languages:
On any page of your Crimson site, look at the top header (the very top bar of the site). You’ll see a language selector. Clicking there lets a reader switch from English to Hindi or Spanish. For instance, if someone is reading in English and wants Hindi, they just choose “हिन्दी” from that dropdown.
In short, Crimson v1.0.2+ gives you the framework for a fully multilingual site—you just supply each language’s content, and your visitors can toggle between English, Hindi, and Spanish by using the language switcher in the header.

Multilingual Settings
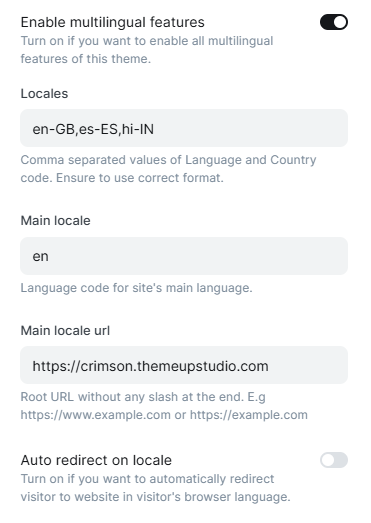
To enable multilingual features, toggle the "Enable multilingual features" button in Site-Wide settings
Locales
This setting tells Crimson which languages you want to offer and which country flags to show for each. You list them as language-country, separated by commas.
- How to fill it in:
- If you want British English, type
en-GB. You’ll see an English label with the UK flag. - If you plan to write in American English, use
en-USso the English label shows the US flag. - To add Hindi (India), you’d write
hi-IN. For Spanish (Spain), writees-ES.
- If you want British English, type
- Why it matters:
- The two-letter code before the dash (e.g.,
en,hi,es) is the language itself. - The two-letter code after the dash (e.g.,
GB,US,IN,ES) tells Crimson which country’s flag to display next to that language in the selector.
- The two-letter code before the dash (e.g.,
Main Locale
This tells Crimson which language will be your site’s “default” (the language people see if they don’t pick one).
- What to enter:
- Put in the two-letter code for your main language (for example,
enfor English orhifor Hindi). - By default, it’s already set to
en(English). If you want Bengali as the default, you would change it tobn.
- Put in the two-letter code for your main language (for example,
Main Locale URL
This is simply the web address for your main (root) site.
- What to enter:
- If your main site lives at
https://www.example.com, write exactly that. - If it’s at
https://example.com(without “www”), use that instead.
- If your main site lives at
- Why it matters:
- When someone clicks to see your default language, Crimson knows to send them to whatever URL you specify here.
Auto Redirect on Locale
When you turn this on, Crimson will check a visitor’s browser language and automatically send them to that version of your site if it exists.
- Example:
- You have English (
en), Hindi (hi), and Spanish (es) enabled in Locales. - Someone visits your site and their browser is set to Spanish.
- With “Auto redirect on locale” enabled, Crimson sees “Spanish” in their browser settings and takes them directly to
https://yourdomain.com/es.
- You have English (
- If you leave it off:
- Every visitor lands on your default language (the Main Locale) first. They would have to manually click the language switcher if they want a different language.
When a language switch occurs from any page, the theme automatically generates all the necessary code and redirects to the correct language page.
Example:
English post URL:
/blog/getting-startedSpanish post URL must also be:
/blog/getting-startedIf you try to use
/blog/comenzando for the Spanish version instead, Crimson won’t recognize it and you’ll see a 404 page in Spanish.Multilingual Ghost install
Installing Ghost for multiple languages follows the same steps as a single-language setup—you just repeat the process for each language. You can host all instances on the same server by installing Ghost into separate folders.
How it works (using the Crimson demo as an example)
Crimson supports English, Hindi, and Spanish. We performed three separate Ghost installations—one per language—and gave each its own URL path:
- English installation
- Directory:
ghost-en/(or any folder you choose) - Site URL (when prompted):
https://www.example.com - Result: English content appears at the root URL (
/).
- Directory:
- Hindi installation
- Directory:
ghost-hi/ - Site URL:
https://www.example.com/hi - Result: Hindi homepage appears at
/hi.
- Directory:
- Spanish installation
- Directory:
ghost-es/ - Site URL:
https://www.example.com/es - Result: Spanish homepage appears at
/es.
- Directory:
ghost-en, ghost-hi, ghost-es) and that you enter the correct URL during setup. If you set the wrong URL—say you install Spanish at https://www.example.com—then your Spanish site will overwrite or conflict with the English site.Step-by-step summary
- Choose one folder per language (e.g.,
ghost-en,ghost-hi,ghost-es). - In each folder, run the Ghost install (e.g.,
ghost install). - When asked for the “Ghost website URL,” enter the URL where you want that language’s homepage:
- Default (English):
https://www.example.com - Hindi:
https://www.example.com/hi - Spanish:
https://www.example.com/es
- Default (English):
- Finish the setup for each instance, and you’ll have a separate Ghost site serving each language at its own URL.
Changes in nginx.conf file
After installing Ghost and setting up NGINX (the web‐server that “routes” visitors to the right place), you’ll see two new files in /etc/nginx/sites-available:
www.example.com.confwww.example.com-ssl.conf
We only need to edit www.example.com-ssl.conf so that NGINX knows how to send traffic to each language’s Ghost installation. Think of NGINX as a receptionist: when someone types in your site’s address, NGINX looks at these files and decides which “department” (i.e., which Ghost instance) should handle the request.
Understand the Default “Location Block”
When you first set up NGINX, it creates a “default” section in that file. It usually looks something like this:
location / {
        proxy_set_header X-Forwarded-For $proxy_add_x_forwarded_for;
        proxy_set_header X-Forwarded-Proto $scheme;
        proxy_set_header X-Real-IP $remote_addr;
        proxy_set_header Host $http_host;
        proxy_pass http://127.0.0.1:2371;

        add_header X-Content-Type-Options $header_content_type_options;
    }
What it means (in plain English):
location / { … }says “for any visitor who goes to the main site address (for example,https://www.example.com/), use this block.”- All those
proxy_set_headerlines pass along information like the visitor’s IP address and requested hostname. proxy_pass http://127.0.0.1:2371;means “send this request to the Ghost service running on port 2371 of the same server.” In other words, all requests to/go to Ghost (English) on port 2371. The port will change based on your setup. You can runghost lsto see which ports are being used.
Add One “Location Block” for Each Additional Language
To make your site work in Hindi and Spanish, you need to add two more sections—one for each language—below the default block. Each new section has two small changes:
- The URL path (location match)
- The port number where the other Ghost instance is running
Hindi example:
Add this block to the same -ssl.conf file:
location /hi/ {
        proxy_set_header X-Forwarded-For $proxy_add_x_forwarded_for;
        proxy_set_header X-Forwarded-Proto $scheme;
        proxy_set_header X-Real-IP $remote_addr;
        proxy_set_header Host $http_host;
        proxy_pass http://127.0.0.1:2372;

	add_header X-Content-Type-Options $header_content_type_options;
    }
location /hi/ { … }
This tells NGINX: “When someone visitshttps://www.example.com/hi/, use these settings.”proxy_pass http://127.0.0.1:2372;
“Send those/hi/requests over to the Ghost installation that’s running on port 2372,” which in our setup is the Hindi version.
Spanish example:
Similarly, add another block for Spanish:
location /es/ {
        proxy_set_header X-Forwarded-For $proxy_add_x_forwarded_for;
        proxy_set_header X-Forwarded-Proto $scheme;
        proxy_set_header X-Real-IP $remote_addr;
        proxy_set_header Host $http_host;
        proxy_pass http://127.0.0.1:2373;

	add_header X-Content-Type-Options $header_content_type_options;
    }
location /es/ { … }
Means “When someone visitshttps://www.example.com/es/, use these rules.”proxy_pass http://127.0.0.1:2373;
Points those/es/requests to the Ghost instance running on port 2373 (our Spanish version).
Key Differences to Notice
- The path you type in the browser
/→ goes to English (port 2371)/hi/→ goes to Hindi (port 2372)/es/→ goes to Spanish (port 2373)
- The port number you set in
proxy_pass- English Ghost is on port 2371
- Hindi Ghost is on port 2372
- Spanish Ghost is on port 2373
That’s why each block looks almost identical, except for those two lines.
Putting It All Together
- Open
/etc/nginx/sites-available/www.example.com-ssl.confin a text editor. - Find the existing default block that starts with
location / { … }. - Below it, paste the two additional blocks: one starting with
location /hi/ { … }and one starting withlocation /es/ { … }. - Save and close the file.
- Restart NGINX so that it re‐reads these changes (typically with
sudo systemctl restart nginx).
After doing this, your server will automatically send visitors to the correct Ghost installation based on whether they go to /, /hi/, or /es/.
Maintaining Each Language Separately
Once this is set, your multilingual setup is ready. Whenever you update or maintain Ghost:
- You do it the same way you would for a single Ghost site, but you repeat the process inside each of the language‐specific directories.
- For example, to update the Hindi version, you’d go into the folder where Ghost for Hindi lives (the one using port 2372) and update that just as you would any Ghost instance.
That’s it! Now even someone without a technical background can see:
- NGINX is just directing traffic.
- Location blocks tell NGINX which folder/port serves which language.
- proxy_pass forwards requests from
/hi/or/es/to the right Ghost “department.”
With each block in place, any visitor typing .../hi/ into their browser will see Hindi content, .../es/ will get Spanish, and anyone at the root (.../) will get the default English site.
Understanding hreflangs
Hreflang tags are HTML attributes (usually output as <link> elements in the <head> of your pages) that tell search engines which language (and optionally, which region) each version of a page uses. In simplest terms:
What they are:
- Special
<link rel="alternate" hreflang="…">tags placed in the<head>section of a page. - Each tag points to an alternate‐language (or alternate‐region) version of that same content.
Why they’re important:
- Prevent Duplicate‐Content ConfusionIf you have the same article in English, Hindi, and Spanish, Google will see three “similar” pages. Without hreflangs, Google might not know which one to show to a given user—and could even penalize you for duplicate content.
- Deliver the Right Version to the Right UserWhen someone in Mexico searches for your site, you’d prefer Google to show them the Spanish version, not the English one. Hreflangs guide Google (and other search engines) to serve the correct language/region URL.
- Improve SEO & User ExperienceProperly implemented hreflangs can boost your visibility in local search results and reduce bounce rates, since visitors see content in their own language right away.
How Google interprets them:
- Crawling & IndexingGooglebot reads every
<link rel="alternate" hreflang="…">on a page and builds a "language‐cluster" of URLs. - Serving ResultsWhen a user searches on Google, the engine checks their browser or Google account’s preferred language (and optionally, their location) and tries to match it with the hreflang cluster you provided.
- Fallback BehaviorIf no exact language/region match is found, Google serves your “x-default” version (if you’ve set one), or else your main (default) language.
How Hreflangs Work in Crimson
Crimson includes a special “hreflangs block” in its theme files that outputs the correct <link rel="alternate" hreflang="…"> tags for each language. By default, this block covers English, Hindi, and Spanish for the built-in page types (e.g., posts, author pages, tags). If you add a new language or create a custom page, you’ll need to update this block yourself.
1. Locate the Hreflangs Block
You’ll find something like this in a Handlebars template (for example, in author.hbs or inside home.hbs):
{{#contentFor 'hreflangs'}}
  {{#author}}
    {{!-- IMPORTANT: If you make any changes here, please copy these to error.hbs --}}
    {{!-- Main Language at www.example.com --}}
    <link rel="alternate" href="{{@custom.main_locale_url}}/author/{{slug}}/" hreflang="en" />
    <link rel="alternate" href="{{@custom.main_locale_url}}/author/{{slug}}/" hreflang="x-default" />
    {{!-- All Other Languages at www.example.com/xy --}}
    <link rel="alternate" href="{{@custom.main_locale_url}}/hi/author/{{slug}}/" hreflang="hi" />
    <link rel="alternate" href="{{@custom.main_locale_url}}/es/author/{{slug}}/" hreflang="es" />
  {{/author}}
{{/contentFor}}
hi) and Spanish (es) automatically, for every built-in page type.2. Update for Each Built-In Page Type
Crimson uses the same pattern for several page types. You must include an hreflangs block for each of these templates:
- author (author profile pages)
- authors (list of all authors)
- archive (date-based archive pages)
- contact (site’s contact page)
- post (single blog posts)
- page (static pages like “About”)
- tag (single tag page)
- tags (list of all tags)
For example, here’s how you’d set it up for a post:
{{#contentFor 'hreflangs'}}
  {{#post}}
    <!-- English (default) -->
    <link rel="alternate" href="{{@custom.main_locale_url}}{{url}}" hreflang="en" />
    <link rel="alternate" href="{{@custom.main_locale_url}}{{url}}" hreflang="x-default" />
    <!-- Hindi -->
    <link rel="alternate" href="{{@custom.main_locale_url}}/hi{{url}}" hreflang="hi" />
    <!-- Spanish -->
    <link rel="alternate" href="{{@custom.main_locale_url}}/es{{url}}" hreflang="es" />
  {{/post}}
{{/contentFor}}
You’ll find similar blocks in each template’s file—just replace {{#author}}…{{/author}} with {{#post}}…{{/post}}, {{#page}}…{{/page}}, and so on.
3. Adding a New Language
If you want to support another language (for example, French fr), edit each hreflangs block by adding a new <link> line:
{{#contentFor 'hreflangs'}}
  {{#author}}
    <!-- English (default) -->
    <link rel="alternate" href="{{@custom.main_locale_url}}/author/{{slug}}/" hreflang="en" />
    <link rel="alternate" href="{{@custom.main_locale_url}}/author/{{slug}}/" hreflang="x-default" />
    <!-- Hindi -->
    <link rel="alternate" href="{{@custom.main_locale_url}}/hi/author/{{slug}}/" hreflang="hi" />
    <!-- Spanish -->
    <link rel="alternate" href="{{@custom.main_locale_url}}/es/author/{{slug}}/" hreflang="es" />
    <!-- French (new) -->
    <link rel="alternate" href="{{@custom.main_locale_url}}/fr/author/{{slug}}/" hreflang="fr" />
  {{/author}}
{{/contentFor}}
Steps:
- Copy the existing English/Hindi/Spanish lines.
- Change the path to
/fr/author/{{slug}}/. - Set
hreflang="fr".
Repeat for every page type: authors, archive, contact, post, page, tag, tags.
4. Handling Custom Pages
If you create a bespoke template (for example, custom-page.hbs for a “Resources” page), Crimson’s default hreflangs block won’t know about it. You must add a similar <link rel="alternate"> block in that template:
{{#contentFor 'hreflangs'}}
  {{#page}
  {{!-- Resources page in English --}}
  <link rel="alternate" href="{{@custom.main_locale_url}}/resources/" hreflang="en" />
  <link rel="alternate" href="{{@custom.main_locale_url}}/resources/" hreflang="x-default" />
  {{!-- Resources page in Hindi --}}
  <link rel="alternate" href="{{@custom.main_locale_url}}/hi/resources/" hreflang="hi" />
  {{!-- Resources page in Spanish --}}
  <link rel="alternate" href="{{@custom.main_locale_url}}/es/resources/" hreflang="es" />
  {{!-- (Add new languages here as needed) --}}
  {{/page}}
{{/contentFor}}
Make sure:
- You update both the default language (
en, markedx-default) and all other enabled languages. - If you add a new language, include that link here, too.
5. Why This Matters
- Google Needs Complete Language Clusters: Each page type (posts, authors, tags, etc.) must list every language version. Otherwise, some localized pages may not be indexed properly.
- Prevent Missing or Duplicate Results: Without proper hreflangs, Google might show the wrong language version to your readers—or see your pages as duplicate content.
- Default Setup for Hindi & Spanish: Crimson already handles
hiandesfor the built-in templates. You only need to worry about adding or editing if you:- Introduce a new language (e.g., French).
- Create a custom page that doesn’t fit the standard templates.
By updating each page’s “hreflangs block” as shown, you ensure that Google sees every language variant—so readers worldwide always land on the right version of any page on your site.
Contact Us
For any assistance regarding making a true multilingual website using this theme, please get in touch with me at https://www.themeupstudio.com/contact/